Showing posts with label mb sd connect c4. Show all posts

2.24.2023

How to Configure MB SD C4 DAS on VMWare?

 If you are using DAS the configuration file must be set for C3 or MB SD Connect C4.


My cal.ini file was in C directory, look at where the DAS icon on desktop is pointing. It took me a long time to figure this out. Also for reasons I don't know my system will only connect with laptop in airplane mode. I use C4 wired connection.

DAS on VMWare

1. Find out F: ProgrammeDASbin folder in F: / and locate Cal.ini file, follow below steps

PartD (C3) Mux:
[SERVER]
REPORT = 0
PLATFORM = PART_D2
SD connect (C4) Mux:
[SERVER]
REPORT = 0
PLATFORM = PART_T (or optional _W for Wi-Fi ONLY communication)

6.06.2022

MB SD C4 W223 W206 Authentication Failed?

 Attention, please! If you got an ‘Authentication has failed, fault number C003’ error when diagnosing/coding new Mercedes Benz model W223 W206 with MB SD C4/C4 DoIP/C5/C6, it means mb star openshell does not work on these cars, even the latest 03/2022 xentry.

Sdconnect does not work on w223 or 206.

MB SD C4 W223 W206 Authentication Failed

CAN_D and CAN_EXT and CAN_INT and CAN_PTI with Ethernet_DOIP are required for w223 or w206 models.

zenzefi certificates are also required for the latest w223 w206 Mercedes Benz cars or mbux7 cars coding or diagnostics.

You need ZenZefi certificates for the ecu you want to code. Without them you can’t do nothing.

You need for every single ecu separate certificates for Diagnostic and separate for coding. And there are 6 different Types of certificates. After sales Basic, Aftersaleaenhanced, Development, Development Enhanced, Production and Suppliers.
Can eCOM diagnose W223 and W213 without a certificate?
No, you need certificate, ecom, or sd c4 doip.
Users have tested with ecom, original MB VCI, 100%
Enet cable which costs a few bucks works!!!

People have done coding and flashing on w223 with a obd to ethernet cable, with online zenzefi no issues.
ZenZefi certificates has been cracked by genius.

The cracked software is compatible with Benz VCI C6, ECOM, MB SD C4 DoIP only.

The cracked software is not officially for sale yet.

DTS Monaco 8.xx won’t do 223 206 either.

DTS Monaco 9 yes.  Need special projects, along with daimler login with zenzefi rights.
You need diagnostic-enhanced, coding, and enhanced rights certificate to do this without either 1 you cannot continue further, if you have all 3 then it’s basic stuff to do like other models. (while doing this make sure the zenzefi portal has valid user id signed in via offline mode via xentry, break vci connection keep xentry open then proceed with dts 9 and with using SecOConboardcommunication project files do your required work.

9.27.2021

Use DAS DIY Update Telematics on Mercedes W211

 Car model and year: Mercedes Benz 221.176 (2007 S600)


Purpose: update the Navigation


Problem:

My NAVI was out of date, so I bought the NAVI V15 (2016 version) DVD, the last available for the USA and it didn’t work right.


How to fix it?

To update Telematics and requires DAS Software running with mb sdconnect c4 hardware.

The Telematics update must be done to make the last NAVI version work correctly. if you don’t have “Bird’s-eye View” or “Video” on the Comand screen, you don’t have the Telematics update… But, you’ll know when you try to install the last NAVI update version.


How to do next?

  1. You need or will need to get, Star/Xentry/Das. I got mine almost six years ago… Version 09/2014 running on Windows XP with a Dell D630 laptop– don’t ask me why but, the DIY version of DAS seems to work best on that old Dell… As many have said, having DAS is a “Must” to do most work on the W221 and will pay for itself the first time you need it…

    Once you get familiar with Xentry, you’ll find that SCN coding (updating software programming, as opposed to just “coding”, which DAS will do…) is not normally available in DAS– it requires access to MB’s online database.

    E.g.,when trying to program, or ‘update’, Telematics/COMAND (control units> communications>telematics> adaptions> programming– or, something like that path), you’ll get to this screen:

Update Telematics on Mercedes W211 with das 1

FYI, For Telematics, I ordered the CD from a dealer, part # A221-827-06-65-26. I was thinking I might could use Developer Data to load it. Dealer emailed me back that the CD-ROM has to come from Germany. I cancelled the order and looked to see if I could just download the .iso file and burn my own CD. It’s not an iso file, BTW, it’s just a CD data disc, as we will see…


  1. If you start searching for stuff like that, Telematics CD, you are probably going to find yourself in the weird world of *******.com. 25USD to join and, like me, you’ll probably find the download you are looking for is no longer available…

    Now, at this point, like me, you’ll find out you have to “start all over again”:

    A. You need to figure out how to change your DAS to do “off-line programming”… See the screen shot above.


Tip, get another hard drive of the same type as the one your Xentry/Das software came on and clone your working hard drive, test the clone and set it aside, in case you FUBAR the good, working drive… I didn’t need the back-up hard drive, but it’s good insurance. Also, I don’t know exactly which Xentry systems are in favor today but, from the discussions on the forum, it seems many owners have the old Dell/XP setup… IMHO, XP is a stable and reliable OS, so, if it ain’t broke don’t fix it….


  1. Without going into too much detail, you need to modify the files that your Xentry hard drive came with. Specifically: (DAS) F:\programme\das\trees\pkw\Flashen. (Your hard drive may have a different drive letter. And, you need to know how to use Windows ‘File’ Explorer, cut and paste, etc., etc.) The “Flashen” folder holds the files that allow offline programming.


  1. The “Flashen” folder is just programming so, one would assume, you can modify it. I tried that without success… Anyway, the “Flashen” folder is out there on the net, so I’ll leave it to you to find a copy of “Flashen” or reprogram it yourself???


  1. If you install “Flashen” (i.e. replace the folder you have with one that allows offine programming), instead of “Xentry Flash access required” on the screen above, you’ll get to a screen that allows “off-line programming”… Hooray… you’ll think… Well… maybe you are half-way there…. more like a quarter of the way….


(If you’re still reading, this may be good time to stop and come back to “5” when you are able to get to this DAS screen after changing your Flashen folder.):

Update Telematics on Mercedes W211 with das 02


  1. Next, when you get to the decision screen of offline vs online and choose offline, unless you’re damned lucky, you’ll probably get errors about VeDok or other mysterious missing “stuff”. Here’s where it gets fuzzy for me… I tried a bunch of “stuff” and don’t know exactly what made a difference… But, here are some more tips…


  1. First, you need a SDflash folder that DAS can read… This may be located in a drive partition. In my case, there were two: (WIS) E:\programme\SDflash and a virtual drive, K:\SDflash. The virtual drive, Alcohol 120% software, was already on my Dell. I think you need the Alcohol 120% or something similar to “mount” the SDflash.iso in a virtual drive in XP. Windows 10 has the “mount” ability built in, just right-click. “Mount” changes the iso file to folders you can read, copy and manipulate.


  1. There are a few dozen SDflash files (.iso) out there on the net. I tried about six… I used ImgBurn (free) software to modify the iso files. I settled on SDflash 2012-11 (Nov 2012), even though my Xentry is 2014-09 ( Newer versions didn’t work for me or, at least, I couldn’t make them work. Also, I don’t think the SDflash folders work in ‘Simulation’ mode because Xentry Simulation uses a fake VIN #, so you should test them on the car when Xentry Simulation gives you an error message that the VIN # and model # don’t match.)…. These, SDflash.iso’s, are large files– 5 to 17 Gb–, so downloading and sharing isn’t a simple task!!!


I know what you are thinking. Why use 2012-11 SDflash— that stuff is 8 years old??? Well, that’s still about 6 years newer than the software the car was born with. DAS will tell you if you have programming that is any newer before updating… One would also think those 6 years were enough for MB to sort out the bugs and they probably didn’t do much, updating, thereafter…


  1. So, you have the SDflash folders and still it doesn’t work??? For me, at least, it came down to something very strange… It seems my DAS version is 2014-09 and the file in SDflash\Release\PKW named “profi_cd.ini” MUST match the 2014-09 version. That is, copy whatever profi_cd.ini file was originally in your SDflash file and replace the file in the 2012-11 SDflash\Release\PKW folder…. here’s what the complete profi_cd.ini for 2014-09 looks like:


[DEFAULT]

DAS-CD-NR=09/2014 (2014-08-13)

FlashData=2014.09.000

CAESAR-NR=03.01.99

MVCI-NR=08.02.026

Aktionierung_PATH=

CD_TYP=5


… just a few lines of code… And, here’s 2012-11… not much difference:


[DEFAULT]

DAS-CD-NR=11/2012 (2013-02-01)

FlashData=2012.11.014

CAESAR-NR=03.01.99

MVCI-NR=08.02.042

Aktionierung_PATH=

CD_TYP=5


See why I said to clone your working hard drive??? If you totally lose track of the mod’s to your hard-drive, you can always start over with your ‘good’ drive… You’ll also find “Search” in Windows File Explorer is your friend… I also pulled out of the closet a USB 2.5” HDD reader that I haven’t used in years, to use my Windows 10 desktop for changes to the Dell HDD files…After a while, you can create your own Frankenstein’s monster with all the SDflash iso’s.


  1. Also, you are likely to get “Insert CD labeled ‘Star Diagnostic Software'”. I think that means you are missing the correct #FDOK file in SDflash\Release\PKW\#FDOK. The one that worked for me with SDflash 2012-11 is:


221_2012101014573400000000.fsam


I have no idea what this file is (note, the date of Oct-10-2012) but, it’s about 64 Mb and is needed to get SDflash 2012-11 to work. It’s also the newest 221_ “.fsam” file in folder “#FDOK” I could find!!! (Location is: SDflash\Release\PKW\#FDOK).


Next, if all is working, you’ll get to this screen for a Comand update:

Update Telematics on Mercedes W211 with das 2

and, this:

Update Telematics on Mercedes W211 with das 3


  1. So, you need ‘2218270665_0001’. That CD, I think, is the one I ordered from MB and it had to come from Germany. After MUCH looking, I found a downloadable .nrg version. Unzipped, it’s less than 500 Mb.

    Now, you have to burn 2218270665_0001, but as what??? .iso, ngr, etc. Here’s my burned CD Hall of Shame:

Update Telematics on Mercedes W211 with das 4


Fifth time’s a charm!!!

9. It’s a DATA file, i.e. just copy the file and folders to a blank CD-R, like you are making a backup of your data on a permanently burned CD-R. (Just guessing here, but DAS has to read the file, exactly one file, and the five folders off the disc you put in the CD changer in the car and just wants the file and folders on the CD… Why it can’t read those from your laptop is a mystery to me…)

Here’s what my burned disc ‘2218270665_0001’ looks like when viewed in Windows 10 File Explorer:

Update Telematics on Mercedes W211 with das 5


Note, I named it “2218270665_0001”. I don’t know if that is needed, however, who knows… Also, I burned it on the Dell D630 DVD RW. I just put the file and folders shown in the pic above on a USB, plugged that into the Dell and burned them to a blank CD on the Dell. Again, I don’t know what difference that made, but it worked… Also, you may very well have all those folders, and one file, in the pic above, on your SDFlash already and, you can just copy and burn them to a CD. I checked and had the folder named “HU221″ in my Dell laptop in drive E:\– although I screwed around with that drive so much, I’m not sure where it came from??? However, in some of my SDflash ISO’s, HU221 was empty!!! So, you may or may not have all the folders and the one .cdi file in your laptop already.


I tried, for quite some time, to decode the CD_INFO.cdi a/k/a 2218270665_0001.cdi — which is from some old technology called “DiscJuggler” and it was a waste of time… no matter what the Google searches for decoding a CDI file say…. I’m not sure what this CDI file is all about but, I surmise it is telling the computer in the car and in your laptop where to go for the updates?


Here’s a sample of what the beginning of the CDI file looks like:

.

.

.


[CD-Info];

CD-Name 2218270665-0001;

# UpdateCD V1.0.0

#

# Automatic generated CD_INFO.CDI-File

# Software from:

# Daimler AG, Sabrina Meier

#

# Generiert am: 21.12.2010 09:35:56

################################################## ##########


# HU221

[2168200726-XXX];

################################################## ##########

# BOOTLOADER_HEADUNIT_ECE_USA

2214424360-001 \HU221\001001\A221442\4360_001\__EMERG_\;


# HU221

[2168200826-XXX];

################################################## ##########

.

.

.

(and so on…)


  1. If you are still here, now your hard work pays off… When you get to: “New control unit software versions are available” you’ll, of course, press F2 and I think you’ll get this, again:


Update Telematics on Mercedes W211 with das 6


  1. Instead of pressing F2, I inserted the disc I named ‘2218270665_0001’ in the CD changer in the car and got an ‘Unknown Format’ on the screen in the car. Ignore that, and then hit F2… I think it asks for the reason for the change, you answer and, then…Voila… you have it!!!

Update Telematics on Mercedes W211 with das 7


In the car, you’ll have the progress shown:

Update Telematics on Mercedes W211 with das 8

Update Telematics on Mercedes W211 with das 9


As others here have said, the process takes about 50 min. So, a battery charger is needed but, forget that BS about 30-40 amps… I held 12.8V with 8 amps indicated on the charger’s LED readout….


  1. When done, you get a screen indicating what has changed:

Update Telematics on Mercedes W211 with das 10


Pretty cool… You get Bird’s eye view, audio in wma format, expanded PCMCIA capability and more… But, most importantly to me, new map capability, albeit, 2016 data…

Update Telematics on Mercedes W211 with das 11

  1. All done, Right???  You just FU’d your cold air conditioning and it will never work again unless you get back in DAS… You’ll get this advice at the end of your Comand update:

Update Telematics on Mercedes W211 with das 12


  1. Like a good German, I did as ordered and went to AAC and reprogrammed the control unit. It did update the software and it didn’t ask for a CD, like Comand does… (Weird, when programming the AC control unit, the brake lights were activated… I guess no weirder than having to reprogram the AC control unit after programming Comand.)

    I also looked at the German language website referred to in the pic above, but it was mostly about the virtues of MB and was of no help….

    One might not even notice this SNAFU in December, but I’m in the tropics and, AC is a year-round necessity. I tested a running car and, no cold air from the AC…

    Somewhere in the hidden maze of my regularly-lubricated-with-ETOH-brain, I recalled ‘something’ about ‘magnetic clutch.’


Sure enough, in DAS, air conditioning>AAC>control unit adaptions is: ‘Read Coding and Change, if necessary’. There’s a tab for ‘magnetic clutch’ and you can set it ‘off’ or ‘on’. Counter-intuitively, the Comand update sets it to ‘ON’… WTF!!! The W221 doesn’t have a magnetic clutch!!! WHO KNEW?… Certainly not the people who made the damn car!!!


THIS IS IMPORTANT: Magnetic Clutch has to be reset to ‘OFF’.


So, there you have it… Sort of…


I don’t know if this helps but thought I’d share with the W221 community, who have helped me out a lot… Also, I tried to document my steps– mostly with pics for my own memory– but, I may have missed a couple or, included something that’s not needed. However, I think it’s all there.


But, I’m not being entirely altruistic– I noticed the AAC needed an update, not that it needed it…

Now that I know how to ‘program’, I’m up for trying to screw something else up, like I did with my previously, perfectly-working Navi!!! (Note: the screw up of Navi occurred with the MB APPROVED DIY SOFTWARE and NOT with the DIY cloned DAS software, so I’m not taken the blame for the mistake… only for the ‘fix’… )


Alright, credit to @mcypert


Maybe you are interested in the best mb sdconnect c4 plus with DAS, xentry, free DTS Monaco,Vediamo:

https://www.obdii365.com/wholesale/mb-sd-connect-c4-benz-scanner.html


http://blog.obdii365.com/2021/09/27/diy-update-mercedes-w221-s600-navi-telematics-with-das/

9.22.2021

Benz Start/Stop ECO Coding with MB SD C4

 How-to: disable Mercedes 2005 to present Start/Stop ECO feature via coding using both Vedamo and DTS Monaco engineering software program.


Preparation:


1.Benz J2534 passthru or Xentry Passthru. MB Star diagnostic system is recommended because it is Mercedes benz’s official diagnostic software for Mechanics. MB SD Connect C4 is still an excellent adapter but it can do a few more things, such as flashing on a dead ECU over DoIP.

2.Vediamo 4.2.2 or version 5.x. It comes with SDConnect C4 hard drive (HDD). It’s more advanced software than Xentry. Vediamo 4.2.2 was released in 2012. There is Vediamo 5.x but you need SD C4/C5 to use 5.x Vediamo.

3. DTS Monaco 8.16. Another engineer program comes with MB SD C4 hard drive.  It’s more advanced software than Vediamo.

4. Seed key calculator. You can find free software online.

There is an open source application, MBSeedKey, https://github.com/Xplatforms/mbseedkey/releases/ This application doesn’t include DLL files though. So, you need to find DLLs. Do google, and you will find them with easy. Put the DLLs in the lib sub-folder (Example: C:\MBSeedKey\lib\*.dll or C:\MBSeedKey\dlls\*.dll or C:\Program Files (x86)\MBSeedKey\lib\*.dll …).

5. A laptop. They have got a C4+HDD+laptop package. software is pre-installed and ready to use. The downside is that the old laptop is slow. You can use any latest laptop you have.

Recommanded PC: (Windows 10, 64bit Intel/AMD CPU, 8GB RAM, 100GB free space SSD)

Installation

Install Xentry XDOS, Vediamo, DTS Monaco and Seed Key Calculator

If you using J2534 passthru (Openport etc), you also need to install J2534 driver, Pass Thru library, activate Vediamo and DTS (do Google).

MB C4/C5 adapter kit can make work easier.

If use J2534 adapter, to make Vediamo 4.2.2 work with a J2534 pass thru adapter,
6. Edit “C:\Program Files (x86)\Vediamo\Caesar\driver\slave.ini”.
7. Find section “[PartJ]” and replace “DeviceName” with your Pass Thru adapter’s name. For example, DeviceName = “Softing – VAS5054A#XXXXXXXX”.
8. I don’t know my adapter’s name? It’s in the windows registry. Or, run Xentry, then xentry will pop up a dialog to let you select a pass thru driver. Type the name in the slave.ini
9. Run Vediamo 4.2.2, and click on “Update” button. Select “Part J” only (unselect all others), click on “Update”.


Disclaimer: Credit to realeric from MB forum.  The tutorial here is for sharing purpose. You are at your risk.


Let’s get started. 


Connect C4 with laptop and vehicle via OBD port

Run Xentry software

Do a quick test.  Does it run? Yes ==> go to next step. No ==> you are doing something wrong, go back.

Turn on ignition switch (don’t run the engine) when you are doing the coding. Don’t press brake pedal and press the start button two times, or turn the key two click.

Always connect an AC-12V charger to the battery in case of battery drain. To save battery, turn off headlight, room lights, HVAC fan.

Let’s Find the Control Unit Name

You are going to disable Start/Stop ECO. Main Engine ECU/Controller controls “Last Mode / Default On / Default Off”, and front SAM controls “Default On / Default Off”. “Last Mode” will be better than “Default On”. So, let find the control unit name (ID) of the Main Engine ECU controller. The control unit name varies depending the vehicle model.

1. Run Xentry. Select Diagnosis.
2. Search “Motor electronics … for combustion engine … ” (or similar items).

Benz Start/Stop ECO Coding with vediamo 1

3. Search “Control unit variant”.
4. It’s MED40 in this vehicle (example). So, let’s do “variant coding” of MED40.


Let’s Do It.

How to Disable Start/Stop ECO with Vediamo?

1. Run Vediamo. Click on “Ecoute” application.
2. Click on “Select…” (1st icon on the top menu)

Benz Start/Stop ECO Coding with vediamo 2


3. On the dialog, check *.cbf and click on “Change folder”
4. Where are *.cbf files? It’s in Xentry. (Vediamo and DTS Monaco use *.cbf, *.smr-d files in Xentry).
5. Select “C:\Program Files (x86)\Mercedes-Benz\Xentry\MB_PKW\Caesar\cbf”
6. Choose “MED40” on the dialog and click on “OK”

Benz Start/Stop ECO Coding with vediamo 3

7. Now the window shows “MED40”, “System:MED40” / “ECUs” / “MED40 – xxxxxx”
8. Right click on “MED40 – xxxxx..” and select “Properties”
9. Change the connection to “xxxxxxx…… HSCAN_UDS_500”. Always choose “500”. Click on “OK”
10. Click on “Initiate ECU Contact” (3rd icon on the top menu)
11. Select “Code the variant of an ECU” (11th icon on the top menu)
12. You will see the “Variant Coding – MED40” dialog.

13. Select “VCD_Implizite_Variantenkodierung” on the dialog. It’s German, not English. Don’t panic.
14. Find “Betriebsstrategie Stopp Start”. Click on it with mouse.
15. You will see “Stopp Start Standard Logik, Default ON” on the right panel.
16. Select “Stopp Start Standard Logik, Last Mode” with mouse.

17. WARNING. STOP HERE, Take a break.
18. Click on “Save to Files”. This saves current parameters in a sub-folder, “MED40”, i.e., “C:\Program Files (x86)\Mercedes-Benz\Xentry\MB_PKW\Caesar\cbf\MED40\YYYY-MM-DD.html”. If something goes wrong, you can recover current states with this file.
19. Go to the folder, verify if it’s saved well. Double click on the file (*.html) and you can see the the content coding (parameters).

20. Click on “ECU-Coding”
21. It will show “warning: SCN number can be erased……”. Ignore it.
22. Click on “OK” (or go or proceed… anyway).
23. It will fail. Don’t worry. It’s normal. It happened because you didn’t have enough “access level to the ECU” for the variant coding.

24. Select a menu on the top menu, “ECU” / “Manual Command Input …”

Benz Start/Stop ECO Coding with vediamo 4

25. Type “27 0B” and click on “Send” button. Why 27??? What is 0B??? It means “Hello ECU, would you let me know a temporary PIN to generate a seed key for access level 0B?”
26. ECU will answer back “67 0B BF DF 6F 37“. It means “Hi, the temporary PIN is BF DF 6F 37“ for access level 0B (= required level for sensitive variant codings).
27. Run “MBSeedKey”. Change DLL folder if the DLLs are not in dlls sub-folder.

Benz Start/Stop ECO Coding with vediamo 5


28. Select “MED40_MED40_…….dll”. Why should I need to select a dll file? Mercedes hided a different seed key algorithm in each DLL. The key calculator simply use the algorithm. So, it needs to know which dll is going to be used. If you choose a wrong dll, the key generator will answer a wrong key, and the ECU don’t allow you to pass. Therefore, you can’t make mistake. Don’t worry.

Benz Start/Stop ECO Coding with vediamo 6


29. Select 0B on Access Level. (There are access levels, such as 1, 3, 5, 9, B. To do EURO6 emission related variant codings(parameter change), 0B access level is required)
30. Type “BF DF 6F 37” (for example) on SEED:, and press “Generate Key”.
31. Key will be displayed “9B 1A 69 C0” (for example).

32. Go back to the vediamo.
33. Type “27 0C 9B 1A 69 C0” on the Vediamo / Manual Command Input… / Request Message and click “Send”
34. ECU must answer back “67 0C“. It means “Ok, you are allowed to 0B level”. If the ECU answer other than 06 0C (for example, 0x7F ….), you did something wrong – go back to step 28.
35. Close the “Manual Command Input…” dialog

36. Open the previous “Code the variant of the ECU” again.
37. Do the STEP 11 ~ 16 again.
38. Click on “ECU-Coding”
39. It will go through. If not, you did something wrong.

40. Click on “Save to Files”. It will save parameters “after” coding. You can compare before/after data to see which parameters were changed.
41. On left tree window, click “System: MED40 / ECUs / MED40 – xxxxx / Function”. You can see “FN_HardReset”

Benz Start/Stop ECO Coding with vediamo 7

42. Double click on “FN_HardReset”. It will make the MED40 reload the parameters you modified.
43. Click on “Exit ECU Contact” (4th icon on the top menu).
44. Close Vediamo program.

You done. Be careful, don’t change any parameters until you know 100% what it is and 100% sure if you are correct.


How to Disable Start/Stop ECO with DTS Monaco 8.x?


DTS Monaco 8.x is more advanced software than Vediamo 4.x or 5.x, and good news is DTS Monaco 8.x works with J2534 Pass Thru adapters.

It’s almost the same with Vediamo 4.2.2. Vediamo 4.2.2 use *.cbf files included in Xentry but DTS Monaco 8.x use *.smr-d files included in Xentry. *.smr-d is newer version of *.cbf, i.e., *.smr-d = *.cbf + *.dll. You can extract the *.dll from the *.smr-d. The DLLs used for the seed key calculator was extracted from the *.smr-d. You can extract it yourself… but someone already did it for you. DTS Monaco 8.x also support *.cbf but only with SD C4 or DoIP adapters. Since you have a J2534 adapter, you can’t use *.cbf in DTS Monaco 8.x. That’s fine as *.smr-d is newer version of *.cbf. You don’t lose anything.

Where is *.smr-d files? It’s in “C:\Program Files (x86)\Mercedes-Benz\Xentry\Kontexte\ODXProjekte\PKW_COMMON\dbr”. You don’t need to beg the files. You already have them.

(1) Install DTS Monaco, activate it, (2) run system configuration, (3) add J2534 adapter, (4) create a project, (5) add control unit modules to the project, (6) close system configuration, (7) create a new workspace from the project : do google or watch youtube. There are many videos.

Here is what others don’t say to you:

8. When you open the workspace, you will see the below screen.
9. Select “MED40” on the quick test tap, and click “Start” to do the quick test. Does it work? It should work. If not, you are doing something wrong. Go back…
10. Do the things on the below image.
11. WARNING. Before doing the coding, save current parameters to a file (“Coding Set” / “Save”)

Benz Start/Stop ECO Coding with dts monaco 1

12. You need to get access level 0B to do the Euro6 emission related variant coding. Do the following things on the below image.
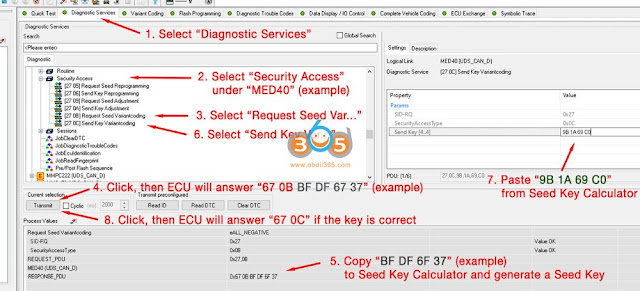
Benz Start/Stop ECO Coding with dts monaco 2

12. Click on “Do Coding”. It will go through.
13. Reset the control unit (Select, Diagnostic Service -> MED40(example) -> Ecu Reset -> [11 01] HardReset Reset, and click on “Transmit”)
14. Done.

Don’t pull the trigger until you sure 100% what you are doing.

http://blog.obdii365.com/2021/09/22/disable-mercedes-start-stop-eco-with-vediamo-and-dts-monaco/

9.12.2021

How to Fix MB SD C4 HHT Internal Fault Code 10766?

Here is the working solution to Mercedes-Benz MB Star diagnostic SD Connect C4 DoIP HHT-WIN software communication error: ‘Internal fault Diagnosis Multiplexer Code 10766’.

solve-mb-sd-c4-hht-internal-fault-code-10766-1

Solution:

solve-mb-sd-c4-hht-internal-fault-code-10766-2

1). Find and run Hyper-V manger in Windows Administrative Tools

solve-mb-sd-c4-hht-internal-fault-code-10766-3

2) Select Virtual Switch Manager

solve-mb-sd-c4-hht-internal-fault-code-10766-4

3). Select Ether and press OK

solve-mb-sd-c4-hht-internal-fault-code-10766-5

4). Select your external network connection type

solve-mb-sd-c4-hht-internal-fault-code-10766-6

5). Open Network & Internet Settings

solve-mb-sd-c4-hht-internal-fault-code-10766-7

6) Select Ethernet- Change adapter options

solve-mb-sd-c4-hht-internal-fault-code-10766-8

7). Select vEtherent and Properties

solve-mb-sd-c4-hht-internal-fault-code-10766-9

8) Double click Internet Protocol Version 4 (TCP/IPv4) and press OK to save

solve-mb-sd-c4-hht-internal-fault-code-10766-10

9) Go to IP address setting.

Set IP address as following

IP address: 172.29.127.124

Subnet mask: 255.255.0.0

Save setting.

Now MB SD Connect C4 HHT-WIN software should be working fine.

9.01.2021

Update MB SD C4 without Batteries

If you need to update a MB SD Connect C4 and you do not have batteries or the power supply/charging circuit is damaged, you only have to edit the toolkit.ini file, modifying the following lines so that the supply and/or battery voltage is lower to the real (it would be enough to set them to zero)
Obviously make sure you have a stable and sufficient external supply.

[SoftwareUpdate]
;
; Voltages necessary for SDconnect firmware updates. These values are only for the pre-check of the toolkit, the values will be checked by the update process again
;
MinUpdateVoltageVBatt=7200
MinUpdateVoltageVExt=11000
;

A reboot is required for the new settings to take effect (Probably a Tkserver restart is enough)

8.25.2021

MB SD C4 Xentry Online Update Connection Failed Solution

Here is the working solution to MB star diagnostic system SDConnect C4 Xentry online update Connection failed problem.


Problem:

I got the 06/2021 500G xentry hard drive for mb sd connect c4 doip. It failed to connect with network.

Report an error “online update Connection failed. The connection attempt has failed.”

MB SD C4 Xentry Online Update Connection Failed 1

MB SD C4 Xentry Online Update Connection Failed 2

Solution:

The error may be caused by wrong IP setting.

If connect SD C4 with WiFi, you should set IP address automatically.

If connect C4 via USB, manually set IP to

IP address: 172.29.127.1

Subnet mask: 255.255.255.0

Then connect c4 via WiFi.

Follow this way:

Go to Network Connections – Ethernet – Right-click Properties – select Internet Protocol Version 4 (ICP/IPv4) –
use the following IP address:

172.29.127.1

255.255.255.0

and save.

MB SD C4 Xentry Online Update Connection Failed solution 1

MB SD C4 Xentry Online Update Connection Failed solution 2

MB SD C4 Xentry Online Update Connection Failed solution 3

MB SD C4 Xentry Online Update Connection Failed solution 4

Related video:

MB SD C4 DoIP WiFi setting

https://youtu.be/zzini2YdxpQ


https://www.obdii365.com/service/solve-mb-sd-c4-xentry-online-update-connection.html