2.26.2023

How to Activate Benz w204 VGS3 on Mercedes W211?

 Tutorial: how to replace the transmission gearbox VGS3 TCU of a Mercedes Benz W204 by the one from a W211.


Tools used:

CGDI Prog MB or VVDI MB

FVDI/AVDI/SVCI 2020

MB Star diagnostic MB SD C4/C5


Main procedure:


Procedures:

Step 1. Renew VGS3

Connect VGS module with CGDI MB.

Activate Benz w204 VGS3 on Mercedes W211 1

Read this used VGS3, which comes from a Benz W204.

Activate Benz w204 VGS3 on Mercedes W211 2

Get Erase Password, then erase it.

Read again to make sure it is not personalized and not activated.


Step 2. Flash VGS3

Connect FVDI2014/AVDI/SVCI 2020 to module, run software

Select

E-class / CLK>>W211 (As of 06/2006)>>Gasoline

Go to “Electronic Transmission Control”.

Identification. Same part number in CG MB.

Activate Benz w204 VGS3 on Mercedes W211 3

Click “MAKE VIRGIN” to load CFF file.

Activate Benz w204 VGS3 on Mercedes W211 4

When we get VIN later, we can write VIN on “Adaptation”.

Activate Benz w204 VGS3 on Mercedes W211 5

Then it will become a real module of W211 E-class.


Step 3. Coding VGS3

Connect SD C4 to module, and open DAS.

Go to “Control Unit Version” menu, here coding is NO Value.

Activate Benz w204 VGS3 on Mercedes W211 6

Development data>>Control unit adaptation>> Control unit adaptation (Variant Coding)>>SCN Variantencoding VGS 73

Select “YE9M” and confirm.

Back to “Control Unit Version” menu,

Select

Actual Values>>Drive authorization

All protection is No.

Activate Benz w204 VGS3 on Mercedes W211 7

Step 4. Activate

Transmission installed in the vehicle, no feel on gear now.

On DAS, go to

Control units>>Drive>>Transmission>>Actual Values>>Drive authorization

All 4 protections are No, since we use Abrites and CGDI MB.

Activate Benz w204 VGS3 on Mercedes W211 8

Back to “Transmission” menu.

Switch up the car again.

Go to

Control unit adaptations>>Detach the transport protection of control module ETC, personalize or activate the control module

Activate Benz w204 VGS3 on Mercedes W211 9

Activate ETC.

Activate Benz w204 VGS3 on Mercedes W211 10

Switch off the car.

Check Actual Values again.

All Yes.

Activate Benz w204 VGS3 on Mercedes W211 11

Credits to hesham essam.


http://blog.obdii365.com/2023/02/26/replace-mercedes-w204-vgs3-by-one-from-w211/

2.24.2023

How to Change Vmax in Mercedes ME 9.7?

 Question:

I finally ordered and received a MB SD C4 DoIP Multiplexer from China (through obdii365.com) and after over a 2 weeks, I managed to connect my SL to a Xentry version from 2019.
So far so good, and it took quite a while to get to that point with multiple installations, iterations and errors/problems etc..

What about the speed limiter? I saw a video on Youtube and it looked pretty easy to alter the Vmax from 250km/h to 280km/h. Again, is that possible with a Chinese C4 and Xentry that is not connected to Mercedes?


Answer:

You can change individual settings under "adaptations". You can do firmware loading or SCN (i.e. VIN encryption) coding without a live/licensed version of MB Star. But there are many things you can do in the adaptations under "Development Data". For example, you can set VMAX there to increase (but not remove) the speed limiter.

The Chinese clone MB SD C4 is capable of doing firmware/SCN coding, but because you don’t have a valid login for MBZ’s online servers, you can’t do that. There are many modules in the car that don’t need firmware or SCN code installed. For example, let’s say you blow a SAM. You can replace it with a new or used one, then Star diagnostic system can set the “adaptations” specific to your car. Also, with Developer Mode enabled (via the license key), you can change most of the adaptations that are contained within the firmware. Vmax is one of them.

The good news is that most Chinese clone SDS system have “developer mode” enabled. This is something licensed shops do not have. It’s meant only for part developers. With this, you can access almost all the adaptations that get set with SCN coding, but with the need to be “live”. the Vmax setting in the ECU is a development mode adaptation.

Check if Developer Mode is enabled on your software, if yes, you can increase speed limit but NOT remove it.

Here’s how to change Vmax in ME 9.7 (ECU used by M272/M263 engines):

how to change Vmax in ME 9.7 1

how to change Vmax in ME 9.7 2

how to change Vmax in ME 9.7 3

how to change Vmax in ME 9.7 4

how to change Vmax in ME 9.7 5


How to Configure MB SD C4 DAS on VMWare?

 If you are using DAS the configuration file must be set for C3 or MB SD Connect C4.


My cal.ini file was in C directory, look at where the DAS icon on desktop is pointing. It took me a long time to figure this out. Also for reasons I don't know my system will only connect with laptop in airplane mode. I use C4 wired connection.

DAS on VMWare

1. Find out F: ProgrammeDASbin folder in F: / and locate Cal.ini file, follow below steps

PartD (C3) Mux:
[SERVER]
REPORT = 0
PLATFORM = PART_D2
SD connect (C4) Mux:
[SERVER]
REPORT = 0
PLATFORM = PART_T (or optional _W for Wi-Fi ONLY communication)

1.14.2023

Free Xentry Passthru 22.12.3 Torrent for Openport 2.0

 Free download Xentry Passthru 22.12.3, DTS Monaco, Vediamo, WIS, EPC for Tactrix Openport 2.0 (Windows 11Pro)

Credit to Xeon1 from MHHAUTO

Free Xentry Passthru 22.12.3 Torrent for Openport 2.0

Xentry Passthru 22.12.3


Release Year/Date : 2022

Version : 22.12.3

System Requirements : Minimum:

Intel Core2Duo, 4Gb ramm, 200Gb HDD

Recommended and Above:

Intel I5, 8Gb RAM, 230Gb SSD

Additional System Requirements:

MBR/Legacy bootloader.

Unfolded assembly weight 176Gb

Interface language: Multilingual (Russian is present)


Description :

Xentry 2022.12.03

DAS

Vediamo 4.02.02 with Passthru interface for CBF

DTS Monaco 8.16 with Passthru interface for SMR

WIS Standalone 07.2021

WIS 10.20

EPC 11.2018

Starfinder 2016

Star finder 2020


Author’s note:

This build is designed to be fast, easy, and hassle-free on the widest possible range of x86 computers with a high degree of compatibility. Statistics show an extremely low failure rate, and this is mainly due to problems with the PC on which the image is installed. Before installation, check the PC with any stress tester, HDD for errors in its operation, and also test the RAM using Memtest.

Keep in mind that Passthru is primarily used as a vehicle testing program. Use the block firmware functions only at your own risk.

The assembly is ideal as a personal diagnostic tool for home use without the significant expense of purchasing an expensive multiplexer.

DO NOT USE ANY FIXES, OPTIMIZERS, IMPROVEMENTS, etc. The system is fully optimized and does not require any additional actions. You perform any additional actions on the system on your own conscience, understanding the risks of a system failure.


What is NOT in the assembly:

– Passthru Truck Ceasar. Disabled at manufacturer level Xentry

– CBF interface in DTS Monaco for PartJ. Disabled PartJ support at manufacturer level DTS

– SMR interface in Vediamo 4. No Vediamo support at manufacturer level

– XUS online. For today, only pre-installed XUS works until a certain date. The build was released after XUS was blocked by the manufacturer. Use an alternative to SWFinder.

– Any certificates. Certificates are purchased separately from competent persons.

– Preinstalled DTS Monaco projects. Everyone uses their own projects, it makes no sense to add too much.


Activation and configuration:

– The image allows you to perform activation and configuration yourself. IS FREE!!!

– Additionally, auxiliary software, calculators, flash drives, projects, etc. are provided.


Add information :

– For GPT/UEFI, you will have to convert MBR to GPT

– Acronis 2021 does not work with all m2 disks

– The assembly has full functionality at the time of copying. If you have problems after installing ON YOUR PC, look for the problem in your PC, drivers, computer hardware, etc. Pay special attention to chipset drivers, they greatly affect PC performance.

Recommendation:

– Use a hard drive with a capacity of at least 20% larger than the installed image to give you some wiggle room when installing add-ons and other updates.

– Try to avoid installing on a PC with an UltraHD screen. Some programs do not support screen scaling.

– The assembly is set to work with OpenPort 2.0 by default. If you are using this plexor, there is no need to install drivers. If you are using another plexor, uninstall the OpenPort 2.0 driver before installing the drivers- Deploy the image only with Acronis 2021, it is included in the torrent distribution inside WinPE

– To install the image, prepare a 6Gb flash drive for WinPE installation ( Acronis 2021) and an external HDD for the image ( 125+ Gb).


Read also:

Tactrix Openport 2.0 with Xentry Passthru Pros and Cons

How to Configure Vediamo with OpenPort 2.0?
12.25.2022

How to Solve Fail to Start MB Star Win10 HDD?

 Here comes the working solution to MB SD Connect C4/SD C5 Windows 10 HDD or SSD cannot start windows problem.

Solve Fail to Start MB Star Win10 HDD 1

Solution:

Power on and press F8 or F12 to choose “Troubleshoot” option (second option if it is Chinese system)

Solve Fail to Start MB Star Win10 HDD 2

Go to Advanced setting (second option)

Solve Fail to Start MB Star Win10 HDD 3

Choose Startup setting

Solve Fail to Start MB Star Win10 HDD 4

Solve Fail to Start MB Star Win10 HDD 5
Solve Fail to Start MB Star Win10 HDD 6
Solve Fail to Start MB Star Win10 HDD 7

Then press F4 to restart computer


Solve Fail to Start MB Star Win10 HDD 8

Solve Fail to Start MB Star Win10 HDD 9

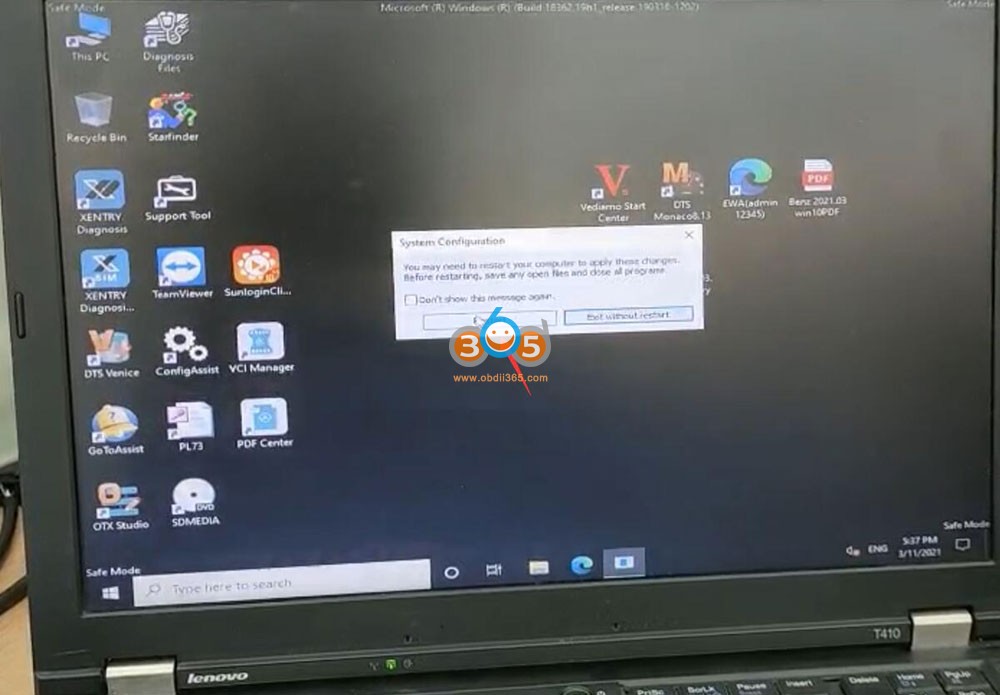
Press Win+R button to run command: msconfig, press OK

Solve Fail to Start MB Star Win10 HDD 10

Then choose Diagnostic Startup

Solve Fail to Start MB Star Win10 HDD 11

Restart computer

Solve Fail to Start MB Star Win10 HDD 12

Software HDD or SSD is ready to use after restart

Solve Fail to Start MB Star Win10 HDD 13

Solve Fail to Start MB Star Win10 HDD 14


12.13.2022

Repair Mercedes 48V Battery by DTS Monaco

 Some info collections of how can be solved Mercedes Benz 48V Battery Failure (W205, W213) through DTS MONACO software.

 
Diagnostics of a 48 volt Mercedes W213 starter battery and a method for solving it using DTS Monaco 8.16 after a long parking or accident. 
Repair Mercedes 48V Battery by DTS Monaco 1

Tool used:
  • Recommended advanced diagnostic equipment is: SD connect C4
  • Xentry for initial diagnosis;
  • DTS Monaco or Vediamo engineer software with a full database to support offline coding
Free download:
SMR-F file and programming video can be downloaded here.
 

Repair Mercedes W205 W213 48v battery by Xentry & DTS Monaco


Step 1: Perform parking and try to Position the vehicle in a flat position for easy repair
Step 2: Make a connection with the tester
Step 3: Check the error code in G1/3 on board the electric battery system battery

Error fault B183304 and B183371

Repair Mercedes 48V Battery by DTS Monaco 2
Check the error code in G1/3 on board the electric battery system battery

Step 4: Run DTS Monaco, Connect the CBF (LIB) file for programming (see images below)

Repair Mercedes 48V Battery by DTS Monaco 3

Repair Mercedes 48V Battery by DTS Monaco 4

Repair Mercedes 48V Battery by DTS Monaco 5

Repair Mercedes 48V Battery by DTS Monaco 6

Repair Mercedes 48V Battery by DTS Monaco 7

Repair Mercedes 48V Battery by DTS Monaco 8

Repair Mercedes 48V Battery by DTS Monaco 9

Step 5: Reset hardware and clear the error to see the results, start the car to stop Check the operation of the car again


Repair Mercedes 48V Battery by DTS Monaco 10
 
If cannot find proper CBF files for DTS, go for CG100 programmer and follow instructions here

12.07.2022

How to Solve HHT-WIN Not List Mercedes R129?

 If your MB Star SDConnect C4 HHT-Win would not work with the R129, here is the fix for missing R129 in HHT-WIN.

solve hht-win no r129 1

solve hht-win no r129 2

You will find the file (for example on Windows 7):

Go to c:\Program Files\Mercedes-Benz\HHT\PKW

Right click on HHTPKW.exe
Select “Create shortcut”. Put it on the desktop.

Right click the new shortcut. Select Properties.
On the line labeled Target: , add the following to the very end of the line:
-b129

There has to be a space between the rest of the existing line, and the -b129

So it should look like …\HHTPKW.EXE” -b129

You can also create another shortcut and replace the -b129 with -b140 for the W140.

Or you can copy and paste this entire line into Target, replacing what’s already there:

“C:\Program Files\Mercedes-Benz\HHT\PKW\HHTPKW.EXE” -b129

Note that the quotes MUST remain.

My HHTPKW.EXE was not in that Program Files section, but at the root of the c drive, but you can find exactly where the file is located by Right-Clicking the HHT short cut, and scrolling to “Open File Location”, and it will take you there. MINE did NOT have the quotes either, so I left them out.

It worked! I found this hidden second hhtwin executable and did the target stuff and boom I can diagnose r129!

solve hht-win no r129 3

solve hht-win no r129 4

If you use hht-win stand alone it has to be a mb star c3 stand alone only supports rs232.
I would still recommend a mb sd c4 doip with xentry the installation is a bit more challenging but than you can work on newer models as well.

If need a corrected version with R129, download Link: HHT-Win.msi.

You need to test by your side.