9.06.2018

Xentry Passthru vs. Xentry Diagnostics: Vehicle Coverage Differences

What is Xentry Passthru & What is Xentry Diagnostics?

“Xentry Pass Thru” and “Xentry Diagnostics” is the Mercedes-Benz brand’s diagnostics and repair solutions for the Independent Repairers carrying out servicing and repairs for euro 5 and 6 certified passenger cars and commercial vehicles

The software is used to process coding, programming and enable dependent control modules for euro 5 and 6 certified passenger cars and commercial vehicles
xentry-diagnostics


What’s the difference of Xentry Passthru & Xentry Diagnostics?

– different vehicle coverage:

Xentry Passthru works with all modules. The only difference is it only works with CAN modules and you can use any J2534 device with it. So 2006 and up vehicles.

Technically yes, but it is artificially restricted according to the StartKey you are assigned based off of your HWID number given to Daimler, which in the US is restricted to emissions related control modules before MY 2018.

But if you activate it with developer keys then you have access to all modules and all vehicles.
xentry-diagnostic-car-list
– different functions & features:

Xentry Passthru has nearly the complete diagnostic scope (quick test, basic diagnosis, flashing & coding control units, reading/deleting fault memory, guided and functional diagnosis, DAS4 services) with the exception of technical restrictions due to the Pass Thru devices:
Only single-channel quick test and functional diagnosis (therefore longer runtime)
Basic diagnosis only in XENTRY Diagnostics
Key programming and DAS4 services only in XENTRY Diagnosis


What Mercedes-Benz models are covered by Xentry Passthru?

Pretty much all can vehicles. Works great with Xentry vehicles. So I would say Xentry Passthru is good for 2006 and up.
Passthru Models are only from EURO5 Vehicles (for Europe)

Just get a dev key, should work on all models..

IMPORTANT: Xentry passthru does not supported this vehicles in DAS:

– Bharat Benz
– Foton
– Fuso
– LKW
– IMO
– Unimog
– PKW using HHT

Also, wont cover special function unless you use full size Stand Alone DAS.


What Mercedes-Benz models are covered by Xentry Diagnostics?

Xentry XODS can work with Mercedes-Benz Passenger car, van, truck, unimogs, buses, super sports cars, industrial major assembikes
xentry-xdos-car-list-1

xentry-xdos-car-list-2

xentry-xdos-car-list-3

xentry-xdos-car-list-4

xentry-xdos-car-list-5

xentry-xdos-car-list-6

xentry-xdos-car-list-7

xentry-xdos-car-list-8

xentry-xdos-car-list-9

xentry-xdos-car-list-10

xentry-xdos-car-list-11

xentry-xdos-car-list-12

Xentry Passthru Review by Real Users:

Tested Xentry Passthru 12.2017 with VAS5054A on C203 2003. all work without problem. on k line too.

I have used my VAS 5054a with 2006 Mercedes CLS55 AMG, 2007 R class, 2008 Sprinter, all in DAS. Everything worked except ignition sensing.
I used VAS5054A with 2014 C 250 using Xentry, everything works fine, no ignition sense, but Xentry gives you a checkbox to manually select.
I have not tried older than 2006 for Mercedes, but I am sure the limitation is in software/drivers.

It was more easy to make the VAS5054 work on 64bit than change Xentry
software to FULL work on 32bit.
xentry-j2534-windows-32-bit
The lower i have test before on 32bit was a W211-006 from 2002,
quick test on all units with VAS5054, and it may work with HHT-win
because it have KK-Line.
After some more test i will poste the solution for VAS5054 work as PassThru on 64bit.


Xentry Diagnostics Review: the latest XDOS 09.2018

i installed 2018–09 successfully.

Note that rollback symptom probably because of a prerequisite software that is failed to install.
try to install from scratch again and look carefully what is failed to install during prerequisite software installation.

if it happen, run xdos setup again or manually try to install the failed software.

usually microsoft visual c++ 2008
32bit
in x:\data\ISSetupPrerequisites\{0BE9572E-8558–404f-B0A5–8C347D145655}\vcredist_x86.exe
64bit
in x:\data\ISSetupPrerequisites\{8D61397C-2AD6–4210–8E43-C2793010DC35}\vcredist_x64.exe


Good to know: For newbies


The toughbook is old because the item is used before delivery and may have some signs of cosmetic wear, but is fully operational and functions as intended. But
It’s absolutely unnecessary to get a brand-new laptop for auto repair.
It’s easily get rubbed or destroyed when used it in real maintenance.
So, to get a second-hand but workable laptop will help SAVE A LOT.

With the Panasonic CF-19’s dedicated serial port, there is no issue for user…. it was plug and play… the HDD with Mercedes software is loaded into the Panasonic and WIS/EPC and XENTRY/DAS has been activated with “activation keys” before delivery…users can use it for Mercedes-Benz diagnostics, coding or programming with SD connect C4, when they receive the package.


9.02.2018

How to install MB Star Xentry Openshell on Windows 10

Xentry Openshell XDOS Windows 10 installation tips and guides for newbies:
– XDOS Windows 10 Startkey not valid
– XDOS Windows 10 security settings
– No Windows 7 VMware on Windows 10
– Windows 10 Ad-Hoc Fix
– Ad-Hoc connection on Windows 10
– Sdconnect C4 Wifi connection on Window 10
– 09.2018 XDOS Windows 10 reliable source
xentry-connect-xdos
In detail…
(Note that all solutions here are based on personal experience and you can have a try as you want, but no one will hold responsibilities of what will happen to your tool and car. Good luck!)

  1. XDOS Windows 10 Startkey not valid
I have strange problem with XDOS version on Win 10 x64In ConfigAssist I can’t enter Xentry key – “StartKey not valid error”
I try to use standalone key center but see 0x8000704C7 error when I start it.
For Win10x64, it is one of the recommended system requirements by Mercedes. but maybe there is some obstacle(s) but a member wrote in this thread that he could handle it as well.
Xentry xdos: xentry diagnosis for 12/24v using partd aka C3 (obsolete), sdconnect aka C4, ecom, xentry connect aka xentry kit 2, and bosch vci aka xentry kit 3
Xentry passthru EU or USA: xentry diagnosis using J2534 passthru devices e.g: mercedes passthru vci (12/24v), avdi, vas5054a (12v), drewtech MongoosePro (12/24v) and many other J2534 compatible devices.

  1. XDOS Windows 10 security settings
I have enough problems with w10 and security settings I just used w7 x86 ultimate went thru no problems did all my addones 1st took some time but , for some reason no taskbar icom for connection setup but can manually open .
if you install xentry passthru, it will not install sdconnect toolkit.
but if you install xentry xdos, the sdconnect toolkit will be installed.
you can set to ‘show’ in the taskbar tray at right bottom corner.

  1. No Windows 7 VMware on Windows 10
Are you booting into a Win7 VM or some sort of Win7 image on your Win10 laptop?
No VMware no win 7 image. It working on Windows 10 64bit professional. The same Ad-hoc like on Win 7. WEP is not problem. You have to manually set new connection with name Road24h/WEP/key uncheck automatic connection or something like this /I forgot/ then use solution which posted Mr.Rocinante and allow Ad-hoc thats all. This working for me. You can see on picture in my post how is connected SDConnect. I tested it on 3 cars and no problem with Ad-hoc. I reinstall full system now because I found one larger hdd

  1. Windows 10 Ad-Hoc Fix
On win 10 will be hard as hosted networks on win 10 not accept wep anymore
This is how I fixed the Win10 Ad-Hoc, wireless SDConnect C4 connection issue.
I downloaded the Win 8.1 wireless adapter drivers for my specific wireless card.
Download ONLY the drivers, not the software suite with the driver.
The Win 8.1 drivers will allow Ad-Hoc to function under Win 10.
I deleted/uninstalled my wireless adapter card to remove all current drivers associated with this wireless adapter.
I double clicked the .exe driver file for Win 8.1. The software found my wireless adapter and installed the Win 8.1 drivers.
Rebooted system, Ad-Hoc functions properly now.
Hope this works for others using Win 10.

  1. Ad-Hoc connection on Windows 10
There seems a problem between Ad-hoc and win 10?
This solution working but also need to be allowed Ad-hoc.
On the pictures you can see adhoc connection on win 10. You need settings from thread “sdconnect xdos configuration” you need set up new connection Road24h with wep encryption and allow adhoc that’s all.
xdos-xentry-windows-10-install-1
xdos-xentry-windows-10-install-2
xdos-xentry-windows-10-install-3
  1. Sdconnect C4 Wifi connection on Window 10
Can somebody help me with wifi connection C4 and win 10 
It worked for me
To save an ad-hoc network and its network key on the guest computer (running Windows 7)
Note down the SSID, security type, encryption type and the key of the ad-hoc network.
Disconnect your connection to any wireless network and switch off/disable your wireless device. Turn on/enable your wireless device but don’t connect to any network. (Thanks GK.)
Click on the network icon in the taskbar.
Click Open Network and Sharing Center > Manage Wireless Networks > Add.
Click “Manually create a network profile”. (This may look silly but we really are going to create an infrastructure network now.)
Enter the network name (SSID), security type, encryption type (if any) and the key that you noted in step 1.
Uncheck both checkboxes (“Start this connection automatically” and “Connect even if the network is not broadcasting”.) [Note that you cannot have the connection start automatically. If you try to have it checked, step 10 will fail. A different way to start it automatically during system boot is described below.]
Click Next > Close. Your connection must appear in the list with the icon suggesting infrastructure (two big screens connected to a tube). Don’t worry about it.
Click Start, type in “cmd” in the search box, press Enter.
In the Command Prompt, type in “netsh wlan set profileparameter name=NetworkName ConnectionType=IBSS”, exactly as shown, without quotes, except you must substitute NetworkName with the SSID (network name) of your ad-hoc network.
If everything went well, you’ll see that the icon has now changed to an ad-hoc icon (three small screens connected to each other) in the Manage Wireless Networks window.
Turn on/enable your wireless device, and try connecting to the Ad-hoc network. You will notice that you no longer need to enter the network key.
To automatically connect to a saved ad-hoc network during Windows boot (can be applied to both guest and host computers running Windows 7)
Click Start > point to All Programs > right-click Startup > click Open. (You may choose Open All Users instead if you prefer).
Right-click an empty space and click New > Shortcut.
Type in “netsh wlan connect NetworkName”. Once again, NetworkName must be substituted with the SSID of your ad-hoc network.
Click Next and enter a fancy name such as “Connect to NetworkName” or something like that.
Click Finish and you’re done. This shortcut will run when Windows starts up, giving you a very brief flash of the black command window, followed by your computer connecting to the ad-hoc network if it is available. Tip: You can also pin the shortcut in your taskbar or copy it to the desktop to easily connect to the network any time you want.
Note: You will probably need Administrator access to complete some of the steps above (in both procedures).

  1. 2018 XDOS Windows 10 reliable source
Do you have any reliable link for 09.2018 Xentry? Better have been confirmed to work no issues with SDconnect?
I’m using the site http://www.obdii365.com/wholesale/201809-mb-sd-connect-compact-c4-software-ssd.html good tech support. Free activation help via remote
Upload images…
2018-09-xentry-xdos-1
2018-09-xentry-xdos-2
2018-09-xentry-xdos-3

2018-09-xentry-xdos-4

2018-09-xentry-xdos-5

7.10.2018

07.2018 Xentry OpenShell Download + How to Install

Mb Star diagnostic 07.2018 Xentry OpenShell XDOS download with security:
2018-07-xentry-openshell-1
2018-07-xentry-openshell-2
2018-07-xentry-openshell-3
2018-07-xentry-openshell-4
100% tested and confirmed

07.2018 XDOS Windows 7 Windows 10 Install:

– 07.2018 Xentry/DAS Windows 7 FAQs:

  1. Try install win7 x86?
Install it on win 7 64 Bit or remove the package.

  1. I can try install win7 x86 but not complete. I have error 393. part gives error. How to solution.
try install at fresh windows SP1 also disable UAC..

  1. Have Communication Error 1.53315.9999 on win7 x86 pro. How to solve
everything fine with me, but make sure of the IP, try to do the MUX firmware again and report

– 07.2018 Xentry/DAS Windows 10 FAQs:

  1. Xentry 07.2018 on windows 10?
today i installed at windows 10 64bit. windows download form microsoft site. before installation i stop windows auto update and disable UAC. firewall. defender. everything work good…

  1. I counted a problem after installing 7/2018 on my Windows 10 64bit:
    “Communication Error 1.53315.9999 – Initialization of the multiplexer has failed”
    The XDOS doesn’t see Ignition-On signal.
Ps. Before I used 03/2018 without any problem.
2018-07-xentry-openshell-communication-error

how did you install 7.18 ? did you uninstall 3.18 and install 7.18?
most probably your problem is windows issue, specially windows 10
I suggest you try your mux on other system first and report

– 07.2018 Xentry/DAS errors and solutions:

  1. Xentry.exe application error?
2018-07-xentry-openshell-application-error
restart and try again, check your memory as well
stop windows defender and UAC
make sure you don’t have viruses
stop antivirus
check if there is any software consuming the memory
check disk usage if it is always 100% in you windows 10 then google its solution which is available online
and if you can do diagnostic for your RAM do that from your laptop

  1. Anyone the missing akktab.csv pkw file for 2018.07 ?
03.2018 akttab for 07.2018 offline coding:


  1. After updating the MB SD Connect C4 MUX firmware I got the cal error 870.
    It seems that the new version has blocked my MUX, even I have applied the blacklisted fix before!!!
Use correct lic.sli and Problem is gone.

  1. Installed this version but when doing a forced regeneration when asked to start engine I am loosing connection with multiplexer?
update full addons and try again

  1. I need Hht diagnostic. Hht only working x86. I can try xentry sim test 212 and 204 not complete. Not working xentry sim. How to solution error. Please help me.
2018-07-xentry-openshell-error
Just finished x32 installation for HHTwin and no problem.


Categories
Hardware
Software
Forms

Keywords
Software Support

Change log
Release Notes 07/2018
  1. New features of XENTRY Diagnosis Kit 3 systems
New features in Support Tool:
The Support Tool has been given a new icon in a new design.
The “Contact Support” tab contains the email address for the User Help Desk.
The “Support Packages” tab has a “Pin icon” located at the left next to each screenshot. When you
click on the button, the Screenshot Tool marking window appears.
Screenshot Tool: After closing the marking screen, the selection screen for the Screenshot Tool
appears. This makes it easier to create several screenshots than was previously the case.
A graphic set of instructions before the test is available in “VCI self-diagnosis”.
“Network self-diagnosis” shows adapter settings and network settings and a connection check is also
run.
“XENTRY Diagnosis Pad” tab: System information displays the connection status to the backend
servers in the form of an immediate status picture.
The “Client test” button in the “Information” is no longer shown, it is now available as bandwidth selfdiagnosis.
The new overview page in the “XENTRY Diagnosis Pad” shows a summarized view of all the relevant system information.

New features in XENTRY Update Service:
If Retail Data Storage malfunctions because of a defect, ConfigAssist can be used to configure the
“RDS failure” fall-back mode. In this mode the data are loaded directly by the XENTRY Diagnosis Pad
from the Internet. Important note: Please coordinate this in advance with your IT manager!
Connected XENTRY Kit I Kit 2 systems are now visible in the XENTRY Update Service Control
Center in Device Administration
The flashware user interface does not contain any details on Regio or the type of Digital Operator’s
Manual, the HLI information is no longer available

New feature of XENTRY Diagnosis VCI:
The WLAN channel for XENTRY Diagnosis VCI can be configured.
Important: This setting is only to be used when the VCI connection has problems!


  1. Data storage media
1 Blu-ray Disc for XENTRY Diagnosis Software for XENTRY Diagnosis Kit 3
1 Blu-ray disc for XENTRY Kit I Kit 2 Update
Telematics and Regio-DVDs, if applicable

Passenger cars:
The following telematics CDs/DVDs are still required (item numbers, market-dependent, plus any special provisions):
1668270859-0001 1718270100-0001 2168274159-0001
1668271300-0001 1718274459-0001 2218270065-0001
1668273900-0001 1978270400-0001 2218270100-0001
1668274600-0001 2048271000-0001 2218270465-0001
1668274700-0001 2128271900-0001 2218270665-0001

Vans:
The following telematics CDs are still required (item numbers):
1668273500-0001
6398271159-0001
6398271259-0001


Changes since the last release
New documents
No entries available
Updated documents
Installing and configuring XDOS with VCI
User manual XENTRY Diagnostics Open Shell Variants
Help Card XENTRY Diagnosis VCI


6.29.2018

MB Star DAS SCN Coding Cannot be Carried Out Solution

Here's working solution to MB Star diagnostic software online SCN coding failed to carry out problem which happened all around the world these days.


Error:

Error in XENTRY

Data transfer has failed (DAS <-> XENTRY)

Possible cause and remedy:

- Incorrect data were received.

- Unknown command or incorrect data in command

Do you went to repeat this procedure?

xentry-error-data-transfer-failed

Error in DAS

The coding could not be caned out (CAL_Comm_Error)

Fault 8.561.6113

The coding may be wrong. (00001)

SCN coding must be carried out again.

If the problem persists, please contact the User Help Desk .
das-coding-cannot-carry-out


Solution:
Go to  C:\programm files\mecredez-benz\addons centerxx
Change folder name "addons centerxx" to "addons center" (delete "XX" letters)
Restart the computer 
Run c:\programm files\mecredez-benz\addons center\addonscenter.exe
It will run auto update with network connection .


6.21.2018

How to install MB HHT-WIN on Windows 7 with XP Mode

Today, I’ll chip in some words with Windows 7 (XP Mode) installation of HHT – Hand Held Tester for Mercedes mb star diagnostic with SD connect C4 or Part D (C3).

Here you go.

How to add HHT shortcuts to All Users Folder in Windows XP 

  1. With the Windows XP Virtual Machine running, right-click on the Windows XP Start button.
mb-star-hht-win-on-win7-xp-mode-1
  1. Click Open All Users from the list.

  1. When the All Users window appears you will be able to copy and paste or drag shortcut icons from the Windows XP Start Menu to the All Users window. The same applies to application shortcuts on the Desktop and in other locations. The key to this tip is making sure that the shortcuts are saved in the All Users Start Menu folder.

  1. Close the Windows XP virtual machine.


How to copy HHT shortcuts of Windows XP Mode Applications to DAS\BIN:

Once the applications in Windows XP have been added to the All Users folder, Windows 7 Start Menu should be updated to include those shortcuts. Follow the instructions below to copy hht shortcuts to DAS\BIN

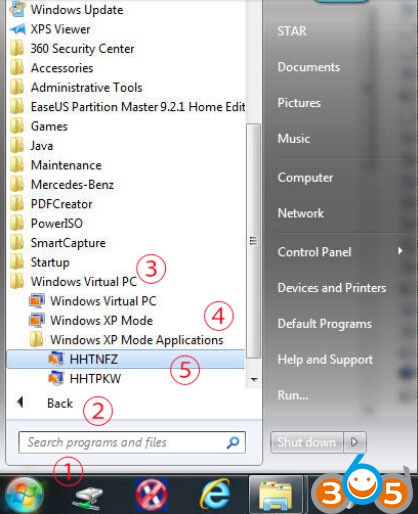
  1. In Windows 7 click on the Windows Orb to open the Start Menu.

mb-star-hht-win-on-win7-xp-mode-2

  1. Click All Programs to view the list of applications.

  1. Scroll down the list and click on Windows Virtual PC.

  1. You should see a folder in this directory named Windows XP Mode Applications, click on it.

  1. A list of Windows XP Mode applications (HHT) shortcuts will appear. Copy those shortcuts to DAS\BIN. Also copy files: hhtwin_vm_start.exe, , hhtwin_vm_start_pkw.bat, hhtwin_vm_start_nfz.ps1.

mb-star-hht-win-on-win7-xp-mode-3
mb-star-hht-win-on-win7-xp-mode-4

How to setup MB HTT software language:

you navigate to

C:\…\HHTwin.ini

parameters:
SPC=02
SPCN=02
SPCP=02
SPCD=02
SPCV=02

change to:
SPC=XX
SPCN=XX
SPCP=XX
SPCD=XX
SPCV=XX


or added to hhtpkw shortcut the language parameter (-L) e.g:

C:\HHT\PKW\HHTPKW.EXE -Lxx


where XX is:

00 = german
02 = english (british)
03 = french
04 = spanish
05 = portuguese
06 = italian
07 = dutch
08 = danish
09 = swedish
010 = finnish
012 = greek
013 = english (american)
017 = turkish
018 = polish
019 = czech
020 = japanese
021 = hungarian
022 = russian
023 = korean
025 = chinese
026 = romanian
027 = serbian

Attachment: HHT-WIN on Windows 7 64 bit
hht-win-on-win7
http://blog.obdii365.com/2018/06/21/set-up-mb-hht-win-software-on-windows-7/